Wednesday, April 29, 2015

Getting Started with WireShark

How many of you are using computers connected to either dial-up, broadband or other high speed networks and did you ever thought what sort of information is going through those network cables when you are online?

All the web info you or others browse on the network…….
All the messengers’ communications on the network…..
All the VOIP calls you or others make on the network…..
All the usernames and passwords you or others send across on the network….
And what not?

All the information you send/receive using your computer on network is visible to anyone monitoring on your network. Want to know How?

Read on…

There are tools for monitoring your network for potential network problems and same can be used for monitoring all the network activity.

Why anyone monitor network?
Most organizations, from the smallest office to the largest enterprises rely on some kind of network monitoring tools to help them analyze performance issues, alert them to threats, and provide reports on the health of the network environment.


What tools available?
PRTG Network Monitor, InterMapper, LogicMonitor, The Microsoft Network Monitor, Munin, Nagios, Orion Network Performance Monitor, Splunk, Wireshark etc among few.

In this article we will discuss How to capture traffic using Wireshark.

1)      What is the price?
2)      Where to download?
3)      How to use it?

1)      What is the price?
    Its open source and free.

2)      Where to download?

3)      How to use it?
a.       First you need to install the software


Click on Installer right for your OS. I am downloading Windows Installer (32-bit)

b.      Download the file


c.      Run the file

d.      It will be downloaded


e.       If you get any warning like this, click on Run


f.       Click on Next
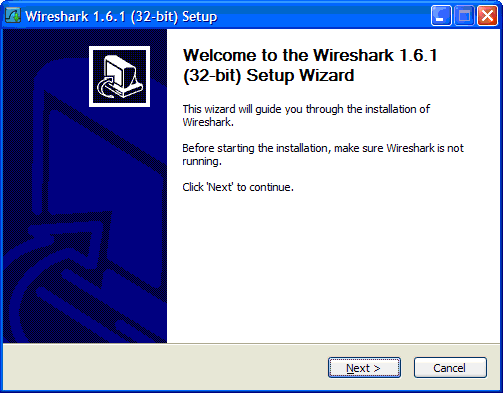

g.       Accept the Agreement


h.       Accept all the default options until you come here


i.       Select Install WinPcap

j.        Installation will begin


k.       If you get any pop-up saying that WinPcap is already installed, click Ok to force the installation.

l.      Click on Next and Finish and you are done.

m.  You can Open WireShark by going to
        All Programs-> WireShark


n.    Initial Screen may look like this


o.    Select the Interface or Network Card on you want to monitor


                  p.   Monitoring starts automatically and it may appear as


q.       You can click on Stop the running live capture button if you want to stop capturing at any time


r.       If you want to set Advanced options while monitoring click on List the available Interfaces tool bar or go to Capture-> Interfaces menu or
      Ctrl +I


s.       Interfaces window appers as


t.    If you click on Options on any of the active Interface, the following window appears


u.       Check Capture packets in promiscuous mode if you want to capture all packets going on your network. This will enable the network adapter to capture all the packets that it can see.

v.      Click on Start for capturing the packets and stop once you are done.

Tuesday, July 24, 2012

Windows Operating Systems Commands

You may probably already known how to get information about your computer using different tools such as System Information . For this post, I thought it would be helpful to share how to view system information directly from the Command Prompt. These are some of the commands that many professionals use on day to day basis. Hope this list is useful.

Ipconfig
Used to get the TCP/IP config values, mainly used to get the IP address of the local machine. It also displays all the IP addresses assigned to that machine.


MSConfig

Used to display windows booting parameters, initial system loading programs info

Ping
Ping is a simple command to test the quality of the network connection between a host and the server. It gives latency and Time to Lift parameter values

Tracert
It gives how many hops each packet takes to reach the given host name

Pathping
Another command somewhat similar to both tracert and ping as this will first list the number of hops between host and the server and then ping every router in between waiting for the response to conclude the connection type.

Net
Used to start, stop or view some network operations

hostname
Displays the Microsoft networking computer name.

Route
Used to manipulate TCP/IP routing information.

Netstat
Get current tcp/ip connection and ports info

Finger
Displays information about the user

Getmac
Used to get the MAC address of the system connected to the network, available in Win7, vista and XP.

cmd
To open another command shell with in cmd shell. Type exit to come out inner shell.

netsh int ip reset all
To quickly reset your NIC back to DHCP with no manual settings,

systeminfo | more
To quickly generate a text summary of your system

netsh trace start capture=yes tracefile=c:\capture.etl
If you need to run a trace without Netmon or Wireshark then run the above command, it will save the trace into capture.etl file

once tracing is completed execute, "netsh trace stop"

netstat -ano 1
Here’s a simple way to see all open network connections, refreshing every second:

shutdown -r -t 0 -m \\localhost or IP address
You can use the shutdown to shutdown or reboot a machine, including your own, in a simple scheduled task


For most of the windows commands you can get help around its usage by appending /? to the command

For example: to get help on how to use hostname command and its parameters type

C:\>hostname /?


Please leave your comments.

How to start blogging?

Blogging is a way of sharing information and a form of online communciation to pass the message to internet users directly. It is a very public activity. Anything that gets posted on the internet stays there forever and helps internet users by bringing a large amount of information together for all to read and use and the same time saves a lot of time because all of the information is right at their fingertips.

Blogging is one of the few activities in business which you should not delegate.  Professional writers may be able to craft press releases, website content and the like but they cannot write your blog entries for you. This is because blogs succeed with human, personality-based touch. It is an easy way to publish fresh content online.

More valuable content means more visitors to your site. It allows anyone self-publish to anyone who can afford a computer and Internet access.  Blogging is becoming a fast and simple way to convey news and other information to others through the Internet.   Recently, there has been much discussion about how libraries may use blogging  to distribute info about library news and events to its users.

It is just more about putting your every day life on the Internet. All kind of people read your blog but they care to respond. To design your blog there are few things you must do is select the templates, custom colors and fonts, drag and drop page elements.  Perhaps the best thing about blogging is that it costs nothing to start.


You can start blogging by going to http://blogspot.com. All you need a google account or else you can create there itself. You can have as many blogs you want and your great content can be easily monetized by placing google adsense ads.

Other popular blogging sites are:

http://www.myspace.com/
http://wordpress.com/
http://www.typepad.com/
http://www.copyblogger.com

Most of the blogging sites allow multiple types of material to be published including pictures, word documents, videos and presentations etc. The owner of the blog possesses the sole ownership of changing the blog depending on their wish.

In addition to writing your own blogs, there are many blogs on the internet has many useful content right from programming to marketing. I will list out top blogs under each category in my next posts.

Please leave your comments

Tuesday, July 3, 2012

Performance testing using LoadRunner


Performance testing is the smartest manner in which Performance testers may use to evaluate their applications just before it finally enters the market scene. In case you didn't do overall performance testing to a software product and clients experience errors and difficulties using the product, then you will surely face huge problem.

As its title suggest performance testing using LoadRunner is about testing reliability, programs, speed, hardware, networks and efficacy of devices. Maybe you are thinking why performance testing is very significant at all forms of applications.

HP LoadRunner is usually an automated performance and testing product from Hewlett-Packard for examining system behaviour and performance, while generating actual load. HP acquired LoadRunner as part of its acquisition of Mercury Interactive in November 2006.

HP LoadRunner software for Mobile is the industry-standard performance testing solution for services and applications. HP LoadRunner became almost a de facto standard for companies that must ensure high reliability and scalability of applications and for this purpose should have a well-functioning system of testing, which allows to determine in advance how applications will behave under real production conditions.

HP LoadRunner supports popular protocols

Web (HTTP/HTML)
Web Services
Sliverlight
SAPGUI
Oracle NCA
Oracle (2-Tier)
Flex
Citrix
Ajax and many other types of applications

In the last few years I've seen a form of trend where in performance testers use tools like fiddler/yslow/httpwatch for scripting purpose in spite of having fully licensed version of the LoadRunner or other performance tools.


LoadRunner has various components that helps achieving evaluating an application:

VuGen:

VuGen predominately consists of scripting in the VuGen environment. All the scripts that you write / debug / test will be done in VuGen itself with one user. If you want to test with multiple users, you must use controller software.

Controller:

Controller is the heart of HP LoadRunner software. This is the place where you will design how users need to be entered into the system, how long vusers need to run and how vusers will be moving out of the system and various other parameters.

Analysis:

Analysis is a piece of software part of HP Loadrunner which does collecting all the event files, logs and summarize all the results from all the LoadGenerators used in the test and draw nice graphs and reports. Depending what other diagnostic tools you have, analysis provides very useful information.

LoadGenerator:

LoadGenerator or Host referred with the same meaning. It is a software residing on a machine and takes commands from controller software and runs the specified number of users and sends the results back to Controller software. To run GUI Vusers on a remote load generator machine, make sure that the LoadRunner agent is configured to run as a process.

Wednesday, November 9, 2011

How to iterate through DataRow ItemArray

If you have data row array data in a variable dr, you can use below foreach loop to iterate over ItemArray values


  foreach (DataRow data in dr)
            {
                foreach (object value in data.ItemArray)
                {
                    Console.Write("{0} ", value);
                }
                Console.WriteLine();
            
            }


Please post your comments

How to sort and filter DataTable rows in C#

To explain with an an example I am creating a DataTable


DataTable dt = new DataTable();


You can add columns in one of these two ways
            
DataColumn id=new DataColumn("ID",Type.GetType("System.Int32"));
DataColumn name=new DataColumn("Name",Type.GetType("System.String"));


or 


dt.Columns.Add(id,typeof(int));
dt.Columns.Add(name,typeof(string));


Then add rows of data


dt.Rows.Add(10,"Bharath");
dt.Rows.Add(5,"Kumar");


Here we use DataTable Select method for filtering and sorting the data. I am not providing any parameter for first parameter (filter) and I am sorting the Data by ID (by default in Ascending order). If you want in Descending order mention "ID DESC"


if you want to filter data for ids > 5 then you can mention the first parameter as "ID > 5"


DataRow[] dr=dt.Select("","ID")


You will get the sorted Row Array in dr variable. Check ItemArray of dr variable for values.


Please provide your comments

How to convert ASCII to EBCDIC binary format in C#

Extended Binary Coded Decimal Interchange Code (EBCDIC) is an 8-bit character encoding used mainly on IBM mainframe and IBM midrange computer operating systems.


EBCDIC descended from the code used with punched cards and the corresponding six bit binary-coded decimal code used with most of IBM's computer peripherals of the late 1950s and early 1960s. It is also employed on various non-IBM platforms such as Fujitsu-Siemens' BS2000/OSD, HP MPE/iX, and Unisys MCP.


Today I am going to discuss how to convert ASCII text into EBCDIC format. ASCII number 65 represents A where as it has different meaning in EBCDIC. Thats why you are reading this article. I will give you sample functions for converting ASCII into EBCDIC and EBCDIC into ASCII and conversion tables for easy use.


1) ASCII to EBCDIC


Most of the times these days, we are dealing with UNICODE characters and we need to convert them to ASCII 8-bit format unless you are working on legacy systems.


This function helps you converting given input string into ascii bytes.


  private byte[] convertToASCIIcharacter(string input)
        {
            System.Text.ASCIIEncoding ascii = new ASCIIEncoding();
            byte[] character = ascii.GetBytes(input);
            ASCII2EBCDIC_Char(ref character);
            return character;
       
        }


ASCII2EBCDIC_Char function looks like this.


private void ASCII2EBCDIC_Char(ref byte[] input)
        {


            int[] A2E = new int[128]{0,1,2,3,55,45,46,47,22,5,37,11,12,13,14,15,
                                   16,17,18,19,60,61,50,38,24,25,63,39,28,29,30,31,
                                   64,79,127,123,91,108,80,125,77,93,92,78,107,96,75,97,
                                   240,241,242,243,244,245,246,247,248,249,122,94,76,126,110,111,
                                   124,193,194,195,196,197,198,199,200,201,209,210,211,212,213,214,
                                   215,216,217,226,227,228,229,230,231,232,233,74,224,90,95,109,
                                   121,129,130,131,132,133,134,135,136,137,145,146,147,148,149,150,
                                   151,152,153,162,163,164,165,166,167,168,169,192,106,208,161,7};


            for (int counter = 0; counter < input.Length; counter++)
            {


                byte temp = (byte)A2E[input[counter]];
                input[counter] = temp;
            }
            
        }


2) EBCDIC to ASCII


  If you want to convert EBCDIC files to ASCII file format, you need to have conversion table. Here you go.


private void EBCDIC2ASCII(ref byte[] input)
        {
            int[] E2A=new int[256] {0,1,2,3,26,9,26,241,26,26,26,11,12,13,14,15,
                                    16,17,18,19,26,26,8,26,24,25,26,26,28,29,30,
                                    31,26,26,26,26,26,10,23,27,26,26,26,26,26,5,6,7,
                                    26,26,22,26,26,26,26,4,26,26,26,26,20,21,26,26,
                                    32,26,26,26,26,26,26,26,26,26,91,46,60,40,43,33,
                                    38,26,26,26,26,26,26,26,26,26,93,36,42,41,59,94,
                                    45,47,26,26,26,26,26,26,26,26,124,44,37,95,62,63,
                                    26,26,26,26,26,26,26,26,26,96,58,35,64,39,61,34,
                                    26,97,98,99,100,101,102,103,104,105,26,26,26,26,26,26,
                                    26,106,107,108,109,110,111,112,113,114,26,26,26,26,26,26,
                                    26,126,115,116,117,118,119,120,121,122,26,26,26,26,26,26,
                                    26,26,26,26,26,26,26,26,26,26,26,26,26,26,26,26,
                                    123,65,66,67,68,69,70,71,72,73,26,26,26,26,26,26,
                                    125,74,75,76,77,78,79,80,81,82,26,26,26,26,26,26,
                                    92,26,83,84,85,86,87,88,89,90,26,26,26,26,26,26,
                                    48,49,50,51,52,53,54,55,56,57,26,26,26,26,26,26};


            for (int counter = 0; counter < input.Length; counter++)
            {


                input[counter] = (byte)E2A[input[counter]];
            }
            
            
        }


You can call the above function something like this


 EBCDIC2ASCII(ref dump_record); and have dump_record declared as 
 byte[] dump_record


If you want to write as Binary file, open an instance of BinaryWriter class with encoding as Encoding.BigEndianUnicode.


Please leave your comments and start asking your programming questions on http://www.techielog.com

Wednesday, August 17, 2011

How to Encrypt and Decrypt passwords in LoadRunner

How to Encrypt a password in LoadRunner?

Some times when you are recording an application, LoadRunner may not do the password encryption automatically. If it does, you will see lr_decrypt(“376347drjhd….”) in the password field otherwise, password is displayed as plain text.

LoadRunner provides a tool called “Password Encoder” which can be found under
Start > All Programs > HP LoadRunner > Tools
in Windows Environment

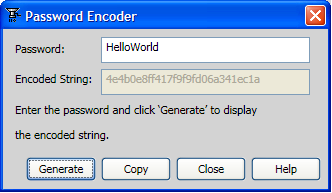
User Interface looks like this:


Fields Description:
Password: Enter the password you want to encrypt, and then click Generate.
Encoded String: Displays the encrypted password string.
Generate: Generates an encoded string after a password is entered.
Copy: Copies the encoded password string to the clipboard.
Once the password is encrypted, the screen appears as


Note: If you click on Generate again, a new encrypted string appears for the same password.
Click on Copy.

How to view Encrypted password?
You may have to view the password sometimes for some reason, and LoadRunner doesn’t provide any tool for Decrypting the password. So, How shall we view?

The simple technique is open a Web(HTTP/HTML) protocol and type the following statement into Action action and Run.

lr_log_message("%s",lr_decrypt("4e4b0e8ff417f9f9fd06a341ec1a"));

Note: The alphanumeric code displayed above is the encrypted password. Replace it with your code.

Result: HelloWorld will be displayed which is encrypted above.

Similarly, we can view encrypted passwords in QTP also.

Data Execution Prevention error while recording in LoadRunner

What is Data Execution Prevention (DEP) in Windows?

Data Execution Prevention (DEP) helps prevent damage from viruses and other security threats that attack by running (executing) malicious code from memory locations that only Windows and other programs should use. This type of threat causes damage by taking over one or more memory locations in use by a program. Then it spreads and harms other programs, files, and even your e-mail contacts.

Unlike a firewall or antivirus program, DEP does not help prevent harmful programs from being installed on your computer. Instead, it monitors your programs to determine if they use system memory safely. To do this, DEP software works alone or with compatible microprocessors to mark some memory locations as "non-executable". If a program tries to run code—malicious or not—from a protected location, DEP closes the program and notifies you.

Is it safe to run a program again if DEP has closed it?

Yes, but only if you leave DEP turned on for that program. Windows can continue to detect attempts to execute code from protected memory locations and help prevent attacks.

How can I tell if DEP is available on my computer?
  1. To open System Properties, click Start, click Control Panel, and then double-click System.
  2. Click the Advanced tab and, under Performance, click Settings.
  3. Click the Data Execution Prevention tab.
By default, DEP is only turned on for essential Windows operating system programs and services.

How Data Execution Prevention affects recording using LoadRunner?
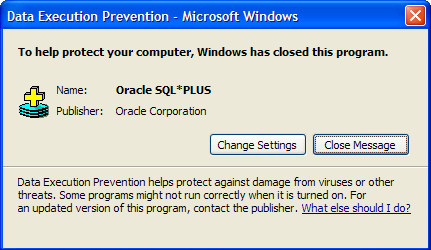
Sometimes when you try to record an application using LoadRunner in Windows, you get an error message looks similar to the following.


Here the application being blocked is Oracle SQL*PLUS. Since this is a trusted program, and to get around this problem, we need to disable DEP for this program or Enable DEP for rest of all Windows programs except this program.

To do that,
  1. To open System Properties, click Start, click Control Panel, and then double-click System.
  2. Click the Advanced tab and, under Performance, click Settings.
  3. Click the Data Execution Prevention tab 
  4. In this case, check Oracle SQL*PLUS
    5. Click on Ok and Ok on System Properties Window.


Try to record the same application again and this time it works.